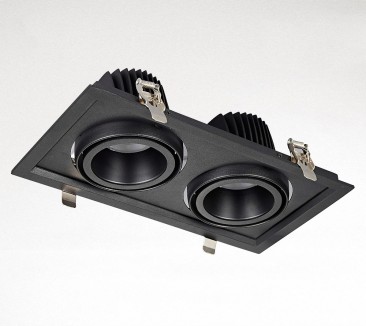
A shared frame changes the composition
A double-head format groups two optical elements inside one visible boundary. That can make a row of accent positions easier to read in a commercial ceiling or create a purposeful rectangular element over a particular area. Its appearance depends on the frame proportions, internal finish, recess, and relationship to nearby services. Compare the actual face drawing rather than assuming all twin fittings have the same visual weight.
The two sources should each have a reason to be there. A designer might use them to address different parts of a display, support a broad focal area, or coordinate related accents within one ceiling position. Whether those tasks are possible depends on the chosen construction and optics. Ask for the proposed adjustment arrangement before drawing beams towards widely separated targets.
A rectangular opening also introduces orientation. Position it with respect to shelving, a circulation axis, joinery, or another stable reference. An otherwise accurate installation can look unsettled if the frame is slightly skewed against a long cabinet line. Make that relationship explicit on the reflected ceiling plan so setting out is based on the architecture rather than an installer estimating it from the floor.
Consider how several frames read together. A single double-head fitting may feel restrained, while a repeated series can become a strong graphic pattern. Review the entrance view and the occupied view, including any low seating. The right choice should organise the ceiling without allowing the hardware to dominate the merchandise, artwork, or interior materials it is meant to illuminate.
Separate two targets before combining the equipment
Start the optical brief by naming the surfaces which need attention. A display pedestal, an artwork, the end of a merchandise rail, and a reception counter present different tasks. Establish their positions, dimensions, finishes, and likely viewing directions. Only then decide whether a shared mounting location can address both targets successfully without a compromise in direction or unwanted source visibility.
Do not assume every double-head fitting offers independent aiming or an unrestricted range of movement. Request a drawing or demonstration of the exact arrangement. Check whether one head can be positioned without interfering with the other, and how the frame affects rotation or tilt. A mechanism which seems generous on a table may have less useful movement once the fitting is retained in the ceiling.
Where the targets differ, review the proposed distributions separately. One surface may need a concentrated accent while another benefits from broader coverage. Ask which optical combinations are actually available for the selected fitting and how they are identified in the order. Avoid accepting a general family description as proof that any two distributions can be combined inside the same frame.
Light falling beyond the target deserves attention. Spill on a polished floor, distracting brightness on a wall edge, or a reflected source in display glazing can reduce the value of an otherwise effective accent. Examine the complete scene from customer and staff positions. The shared frame is a mounting decision; the design still needs to control each beam and its consequences.
Read the section through the whole fitting
A twin assembly occupies more than the visible aperture. Obtain the opening dimensions, overall face, body depth, retaining arrangement, ceiling-thickness limits, driver space, and connector details for the proposed version. A ceiling with room for one compact spotlight does not automatically have room for a longer shared frame. Joists and service channels may cross precisely where the rectangular body would sit.
Map those constraints against the actual structure. A light position can look clear on a services plan while a small bracket, duct hanger, or concealed bulkhead makes installation difficult. Ask the contractor to inspect representative locations before bulk cutting. Include the hand clearance needed to connect and position the assembly, not just a geometric box around its metal body.
Adjustment can increase the space requirement. An optical head may move above or beside the main enclosure, and cable loops must remain correctly arranged during that motion. Review the permitted movement with the selected installation conditions. Do not use the resting height of a straight-down sample as the complete clearance specification for every aiming position.
Thermal requirements come from the actual assembly instructions. Establish how the fitting and any driver relate to insulation and other heat-sensitive materials. Neither a metal enclosure nor a spacious-looking recess establishes permission to cover the equipment. Coordinate the ceiling detail with the appropriate professional where insulation, a protected construction, or restricted ventilation affects the proposed installation.
Make glare checks from the occupied viewpoints
Two light sources within a frame can be conspicuous when both enter a person's line of sight. Review the view from a sofa, a sales counter, a desk, or the approach to a display. Adjustment towards the intended target may expose part of the luminous element which is hidden when the head points vertically. Evaluate the final aiming position, not merely the delivery configuration.
Reflectors, recess depth, baffles, lenses, and surrounding brightness all affect comfort. A dark internal finish can influence appearance, but it does not establish a numerical glare result. Request relevant optical information for the exact candidate and use a realistic mock-up where the visual judgement matters. Product photographs without power applied cannot demonstrate what an observer sees during operation.
Highly reflective merchandise deserves its own trial. Jewellery, bottles, polished metal, lacquered cabinetry, and framed work behind glass can create bright images from unexpected directions. Move around the target rather than approving the first attractive viewpoint. The designer may need to adjust source position or distribution to preserve sparkle and emphasis without creating an irritating reflection.
Balance accents with the background scene. A strong pool against an almost dark room can feel harsh even if the source is physically shielded. Review walls, circulation, and nearby lighting layers at the intended scene settings. Good accent lighting guides attention; it should not oblige occupants to keep averting their eyes from the ceiling.
Use a sample frame to settle ceiling details
Build a representative opening in the intended ceiling material and finish. Install the complete sample, aim it, connect the selected control arrangement, and inspect it from across the room. Check edge coverage, flatness, orientation, retention, and the appearance of the recess. A loose sample held overhead cannot reproduce how the frame behaves against a finished, slightly imperfect surface.
Removal is part of that exercise. Have the person responsible for maintenance release the fitting, reach the connection, and refit the assembly. Observe clip pressure, tools, finger access, and the risk of marking the edge. A large rectangular opening may make access easier in one respect while making the surrounding board more vulnerable in another. Let the practical trial inform the final detail.
If the project replaces an existing twin fitting, measure the old hole directly. Record chipped corners, paint shadows, thickness, and any repairs. Nominal descriptions and face dimensions cannot establish whether a new frame will cover the existing condition. Explain to the supplier whether making good is permitted and include photographs of the uncovered opening.
Keep the approved sample and its documentation together until delivery checks are complete. Frame depth, spring design, driver enclosure, and optical assembly can change without a dramatic difference in a catalogue photograph. Confirm that the delivered configuration matches the accepted trial before allowing repeated ceiling openings to be cut from its drawing.
Controls and circuit grouping need a clear intention
Specify how the lighting should operate in the room. The two heads may serve one scene, or the design may call for different control behaviour. Ask whether the offered assembly supports the intended electrical arrangement and obtain the relevant connection information. Do not assume that a shared physical frame implies either shared or independent electrical control.
Where dimming is required, identify the proposed driver and control combination. Test starting, transition, low-light operation, switch-off, and recovery after an interruption. Compare both optical heads in the sample arrangement and investigate visible differences. A quotation that simply includes the word dimmable leaves too much unresolved for a project with particular control requirements.
Coordinate wiring and access with the electrical contractor. The frame can conceal connections, but concealment does not remove the need for appropriate enclosures, strain relief, and safe service procedures. Make the location of remote equipment easy to identify after the ceiling closes. A photograph taken before closure is often a useful addition to the handover package.
For changing retail layouts, record the accepted aim and explain how staff should request alterations. Repointing one head may change glare, coverage, and the visual balance with its neighbour. Give the operator a practical distinction between permissible scene adjustment and a change which needs the lighting designer or installer to review the setting.
A procurement brief that can be answered accurately
Send the ceiling opening and available space, target descriptions, desired face finish, intended distributions, adjustment requirement, electrical supply arrangement, control needs, quantity, and destination market. Include the room drawing if a shared position must serve two different surfaces. These details let the enquiry focus on a suitable assembly rather than a photograph which merely resembles the desired look.
Ask for current dimensions and installation instructions for the proposed double-head fitting. If the quotation includes alternative versions, have each one identified clearly with its differences. Keep product-specific performance information separate from general selection advice, and do not fill gaps by combining figures taken from unrelated catalogue entries. Accept the exact configuration through its own documents and sample.
CE and RoHS documentation can be requested for the relevant models during technical review. Match the returned material to the offered assembly and target market requirements. Any additional approval, environmental protection, or protected-ceiling requirement needs its own explicit consideration; it cannot be inferred from the fitting's category or a familiar-looking enclosure.
Confirm the current minimum order quantity, delivery schedule, packaging, and replacement-component arrangements for the chosen version. Describe any branding or project labelling requirement as part of the enquiry. A clear carton reference and location schedule can prevent similar-looking optical variants being interchanged when installers distribute equipment across several rooms.
Plan packaging and identification for a multiroom installation
A project containing several frame finishes or optical variants benefits from a clear unpacking plan. Ask how cartons and individual items will be identified, and provide the location codes needed by the site team. A label that distinguishes reception, corridor, and display applications is more useful than a handwritten description added after similar components have already been mixed in a storage cupboard.
Review how exposed decorative surfaces and removable parts will be protected during transport and site storage. Dust, abrasion, impact, and misplaced accessories can compromise an otherwise acceptable delivery. Describe any requirement for grouped room packages, protective wrapping, installation sheets, or spare identification during the enquiry. Confirm the proposed arrangement rather than assuming the packaging will suit an unfamiliar construction programme.
For sample acceptance, photograph the unpacked contents and compare the bill of materials with the assembly instructions. Check that mounting hardware, electrical accessories, and any specified tools are present. Establish an orderly place for rejected or damaged items so they do not accidentally return to the installation stock. Early organisation avoids a hurried substitute being fitted merely because the correct bracket has disappeared.
At the end of the project, consolidate retained components into clearly identified maintenance stock. Keep finishes separated and explain which optical and electrical combinations belong together. That modest administrative effort preserves the value of the original technical review when a future technician reaches for a replacement without having participated in the installation.
Preserve the accepted arrangement through handover
At delivery inspection, compare the physical item, included parts, finish, connectors, and identifying information with the approved sample. Inspect packaging condition and record any discrepancy before installation spreads the consignment around the building. An early comparison protects the ceiling work as well as the lighting selection.
After installation, review beam positions with the furniture and displays close to their final condition. Check unwanted spill, reflections, and source visibility from occupied positions, then record accepted settings. Retain the installation drawing, component details, and maintenance procedure. The rectangular frame should make the ceiling more orderly while leaving the individual lighting tasks understandable to the people who maintain and operate the room.
For the next quotation step, provide measured ceiling information and a short account of what each head needs to illuminate. Request an appropriate double-head recessed proposal with its current drawing and supporting documents. That gives the discussion a practical foundation: two useful light directions within one coordinated fitting, assessed against the real ceiling and the room below it.